There is something profoundly soul-stirring about the aroma of chicken sizzling over an open flame. It evokes memories of sun-drenched afternoons, rustic backyard gatherings, and the communal joy of sharing a meal that has been prepared with patience and care. However, many home cooks struggle with the most common pitfall of outdoor cooking: the dreaded dry, flavorless poultry. We have all experienced that disappointing piece of chicken that looks beautiful on the outside but feels like sawdust on the inside.
Table of Contents
Table of Contents
This guide is designed to transform your approach to grilling. By embracing traditional techniques and understanding the simple science of heat, you can produce a result that rivals the best smokehouses in the country. We are moving beyond basic recipes to explore a method that prioritizes moisture, deep seasoning, and a mahogany-colored glaze that shimmers under the light. If you are looking for a quicker alternative for busy weeknights, you might also enjoy this Amazing 45-min Juicy BBQ Chicken, which utilizes similar principles in a condensed timeframe.
As an Amazon Associate, we may earn from qualifying purchases.

Amazon.com
Check price on AmazonThe Secret to Achieving Juiciness: Brining vs. Marinating
To achieve the succulent texture seen in professional food photography, we must address the internal structure of the meat. While many people reach for a marinade, the true secret of the rustic kitchen is the saltwater brine.
Why a Saltwater Brine Is the BBQ Game-Changer
Brining is a process where chicken is submerged in a solution of salt and water. Through the process of osmosis, the salt penetrates the muscle fibers, breaking down tough proteins and allowing the cells to hold onto more moisture during the cooking process. When the heat hits the meat, instead of the juices evaporating immediately, the brine acts as a reservoir.
For an authentic, deep-flavored result, a 30-minute quick brine can make a world of difference. It ensures that even if you leave the chicken on the grill for an extra minute, the interior remains glistening and tender. This step is the primary insurance policy against the high-heat environment of a traditional grill.
Best Cuts of Chicken for the Grill
While you can certainly grill a whole bird, focusing on specific cuts allows for better control over the final product.
- Chicken Thighs (Bone-in, Skin-on): These are the gold standard for BBQ. The higher fat content and the presence of the bone protect the meat from drying out. They are incredibly forgiving and develop a rich, savory flavor.
- Chicken Breasts: These require a more watchful eye. Because they are leaners, the brining process is non-negotiable. To keep them juicy, they must be pulled from the heat the exact moment they reach the safe internal temperature.
- Drumsticks: A favorite for rustic gatherings, these are naturally juicy and easy for guests to handle.
If you find yourself craving a different flavor profile that still utilizes these tender cuts, consider trying this Easy Hawaiian Chicken with Coconut Rice Recipe for a tropical twist on your next dinner.
Essential Components for Authentic Flavor
To achieve that sticky, caramelized crust and well-seasoned interior, you will need a combination of a dry rub and a high-quality glaze.

- 4 to 5 pounds of bone-in, skin-on chicken thighs or drumsticks
- 1/2 cup of coarse kosher salt (for the brine)
- 1/4 cup of light brown sugar (packed)
- 1 tablespoon of smoked paprika for an earthy color
- 1 tablespoon of garlic powder
- 1 tablespoon of onion powder
- 1 teaspoon of freshly cracked black pepper
- 1/2 teaspoon of cayenne pepper for a subtle heat
- 1.5 cups of high-quality BBQ sauce (choose a tomato-based sauce for the best caramelization)
- 2 tablespoons of melted beef fat or unsalted butter (to add a rich, traditional finish to the sauce)
- 4 cups of cold water
Master the Method: Step-by-Step Instructions
Follow these detailed steps to ensure your chicken stays moist while developing a professional-grade char.
- Step 1: Dissolve the kosher salt and half of the brown sugar in four cups of cold water in a large bowl. Submerge the chicken pieces fully in this brine and refrigerate for at least 30 minutes, but no longer than two hours, as over-brining can make the texture mushy.
- Step 2: Remove the poultry from the brine and rinse each piece under cold water to remove excess surface salt. Pat the skin extremely dry using paper towels. Dry skin is the only way to achieve a crispy, golden-brown exterior.
- Step 3: Combine the remaining brown sugar, smoked paprika, garlic powder, onion powder, black pepper, and cayenne in a small ramekin. Coat each piece of chicken generously with this dry rub, pressing it into the skin to ensure it adheres during the cooking process.
- Step 4: Prepare your grill for “Two-Zone” cooking. This means having one side of the grill at a high-heat setting for searing and the other side at a lower, indirect-heat setting for gentle cooking. If using charcoal, pile the hot coals on one side of the basin.
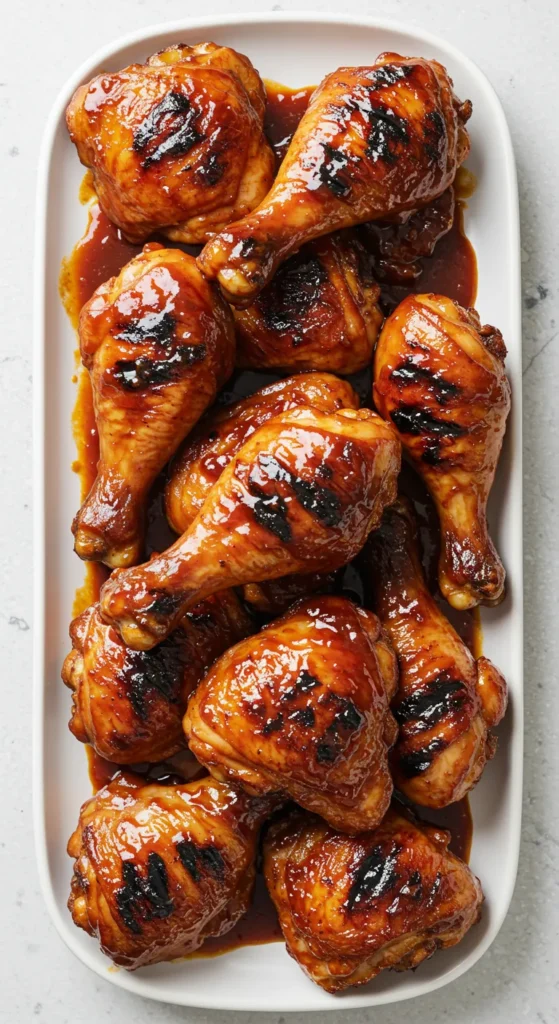
- Step 5: Place the chicken skin-side down on the high-heat side of the grill. Sear for 3 to 4 minutes until the skin is well-charred and releases easily from the grates. This triggers the Maillard reaction, creating those complex, savory flavors we associate with authentic BBQ.
- Step 6: Move the seared chicken to the indirect-heat side of the grill. Close the lid and maintain a steady temperature of approximately 350°F. Allow the chicken to cook undisturbed until the internal temperature reaches 155°F for breasts or 165°F for thighs.
- Step 7: While the meat cooks, whisk your BBQ sauce with the melted beef fat or butter. This addition provides a glossy sheen and a traditional, mouth-coating richness that mimics the flavor of old-school smokehouse recipes.
- Step 8: Once the chicken reaches the temperatures mentioned in Step 6, begin brushing the sauce over the meat. Flip the pieces and apply multiple thin layers every 3 minutes. This builds a “lacquered” finish rather than a thick, gloopy one.
- Step 9: Continue this process for about 10 minutes until the sauce has bubbled and turned into a dark, sticky glaze. The final internal temperature should be 165°F for breasts and 175°F for thighs.
- Step 10: Remove the chicken from the heat and transfer it to a warm platter. Cover it loosely with foil and let it rest for at least 8 to 10 minutes. This allows the juices to redistribute through the fibers, ensuring every bite is moist.
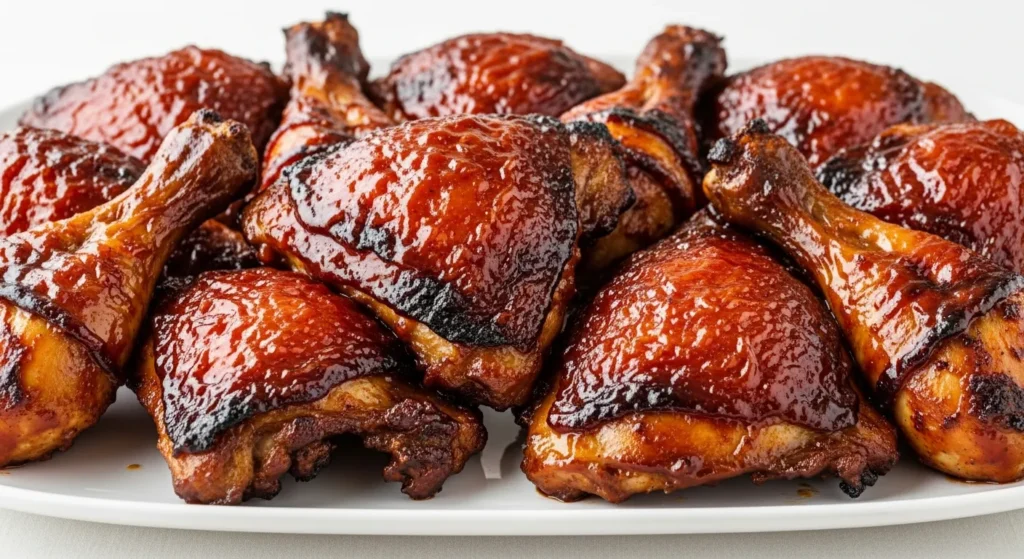
The Science of the Perfect Glaze
Understanding the “Sugar Burn Point” is critical for visual success. Most BBQ sauces are high in sugar. If you apply the sauce at the beginning of the grilling process, the sugar will burn and turn bitter long before the meat is cooked. By following the “10-Minute Rule” outlined in the instructions, you allow the heat to thicken the sauce into a beautiful, mirror-like coating without scorching it. This creates the deep mahogany color and the tacky, finger-licking texture that defines world-class BBQ.
Pro-Tips for the Best Visual Results
To make your dish look as good as it tastes, pay attention to the details. Always use a meat thermometer; relying on time alone is the fastest way to overcook the meat. Remember the concept of “Carryover Cooking,” which means the internal temperature will continue to rise by about 5°F after the meat is removed from the grill. Pulling the chicken just slightly before it hits the final target ensures the interior remains succulent.
When serving, garnish with a sprinkle of fresh chives or flat-leaf parsley. The vibrant green provides a sharp contrast to the deep red of the BBQ glaze, making the dish pop on the plate.
What to Serve with BBQ Chicken
For a truly traditional meal, pair your chicken with classic, rustic sides. A creamy coleslaw provides a cold, crunchy contrast to the hot, sticky meat. Honey-buttered cornbread or a well-seasoned potato salad are also excellent choices. If you want something lighter, grilled corn on the cob with a squeeze of lime can balance the richness of the BBQ sauce.
Storage and Reheating
If you have leftovers, store them in an airtight container in the refrigerator for up to three days. To reheat while maintaining juiciness, place the chicken in a baking dish with a splash of water or chicken broth. Cover tightly with foil and warm in a 300°F oven until heated through. This gentle steam prevents the meat from drying out during the second round of heating.
Frequently Asked Questions
How do I keep BBQ chicken from drying out?
The most effective method is a combination of brining the meat for 30 minutes before grilling and using a meat thermometer to ensure you do not exceed the target internal temperature. Resting the meat for 10 minutes after cooking is also vital.
Should I put BBQ sauce on chicken before or after grilling?
Sauce should always be applied during the final 10 to 15 minutes of cooking. Applying it too early results in the sugars burning, leading to a bitter taste and a blackened appearance.
Is it better to grill BBQ chicken on high or low heat?
The best approach is the “Two-Zone” method. Use high heat for a short time to sear the exterior and create a char, then move the meat to low, indirect heat to finish cooking the interior slowly.
Can I make this Juicy BBQ Chicken in the oven?
Yes. Roast the seasoned chicken at 375°F until it is nearly cooked through, then apply the sauce and switch the oven to the “Broil” setting for the final 5 minutes to caramelize the glaze.
What is the safe internal temperature for chicken thighs?
While 165°F is the food-safe minimum, chicken thighs are actually better when cooked to 175°F. The extra heat helps break down the connective tissue, making the dark meat even more tender.

Perfectly Juicy BBQ Chicken
- Total Time: 70 minutes
- Yield: 6 servings 1x
Description
A masterclass in rustic BBQ chicken, featuring a saltwater brine for maximum moisture and a slow-lacquered mahogany glaze.
Ingredients
- 4–5 lbs bone-in, skin-on chicken thighs or drumsticks
- 1/2 cup coarse kosher salt
- 1/4 cup light brown sugar, divided
- 1 tablespoon smoked paprika
- 1 tablespoon garlic powder
- 1 tablespoon onion powder
- 1 teaspoon black pepper
- 1/2 teaspoon cayenne pepper
- 1.5 cups tomato-based BBQ sauce
- 2 tablespoons melted beef fat or butter
- 4 cups cold water
Instructions
- Dissolve kosher salt and 2 tablespoons of brown sugar in cold water to create a brine.
- Submerge the chicken in the brine for 30 to 60 minutes in the refrigerator.
- Rinse chicken under cold water and pat the skin completely dry with paper towels.
- Mix the remaining brown sugar with paprika, garlic powder, onion powder, black pepper, and cayenne.
- Coat the chicken thoroughly with the spice rub.
- Preheat the grill for two-zone cooking with a high-heat and a low-heat area.
- Sear chicken skin-side down over high heat for 4 minutes until charred.
- Move chicken to the indirect-heat side and cook with the lid closed until internal temperature hits 155-160°F.
- Whisk BBQ sauce with melted beef fat and brush onto the chicken in thin layers.
- Continue cooking and glazing for 10 minutes until a sticky crust forms and the internal temp reaches 175°F for thighs.
- Rest the chicken for 10 minutes before serving to lock in juices.
Notes
Always use a meat thermometer for accuracy. For breasts, pull at 160°F as carryover cooking will bring it to the safe 165°F mark.
- Prep Time: 40 minutes
- Cook Time: 30 minutes
- Category: Main Course
- Method: Grilling
- Cuisine: American BBQ
Nutrition
- Serving Size: 2 pieces
- Calories: 450 kcal
- Sugar: 14g
- Sodium: 850mg
- Fat: 26g
- Carbohydrates: 18g
- Fiber: 1g
- Protein: 35g